As promised in an earlier post, I wanted to share the wreath tutorial that I made at the beginning of last summer. The flowers can be substituted for other seasons but the instructions remain the same. Here is what you will need to get started...
Depending on your project you will need one or more grapevine wreaths. I have double doors leading into the back door of my house so I always put two matching wreaths to greet my guests. If you are doing two or more identical pieces I strongly encourage you to do them at the same time. It is easy to place the flowers on both wreaths at the exact same place if you do them together. These are 16-17 inch wreaths. You can purchase them at any craft store.
You will also need the basics: a hot glue gun and glue sticks, scissors, wire cutters, craft wire wrapped with white floral tape OR white chenille stems.
I wanted to accent my wreaths with hand painted initials, burlap and a little bit of raffia. I got these unfinished letters for half price at Hobby Lobby. I keep burlap on had as a crafting staple. I buy it by the yard and cut it according to the project that I am doing. For this project you will need 4 or 5 feet of 6 inch wide burlap. You will need a little more if you do more than one wreath. It can also be purchased in a prepackaged roll. You will also need craft paint and clear enamel for your letter. And don't forget a small paint brush.
...and of course the flowers. These are all silk and I purchased them from several different stores. There is an abundance of silk flowers that can be purchased at any major craft store. This can be as simple or elaborate as you choose. Here is my method for selecting flowers for most arrangements:
I always choose one main flower. This is important because this flower should be the "main theme" of your piece. In this case it is the red geranium. I have red geraniums all around my house almost every summer. Love them! So the rest of the flowers were based on those.
I wanted to add the touch of green so I chose the cymbidium orchid in green.
For a filler flower, I chose the the small white daisy for a little POP. Do not be afraid to add a little more color by selecting another small filler flower. In this case a small amount of purple would have been good.
When working with any florals, never underestimate the power of greenery. I know that is not what you notice when you look at an arrangement but it is very important. Greenery gives arrangements depth and dimension. For these wreaths I used FOUR different types of silk greenery. The first type was the big beautiful leaves on the red geranium bush. When you are purchasing flower stems and bushes always pay attention to the foliage on them. You may get more bang for your buck if you choose the one with the best foliage. The second one that I used is a light green and white stem greenery. The third is a woodsy type. It is on the darker end of the spectrum. And the final touch was a simple fern.
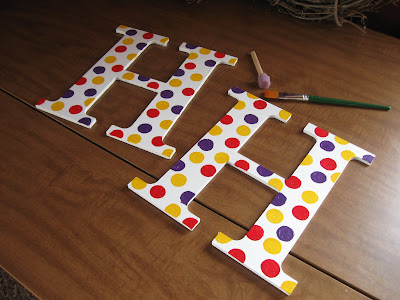
Here are my letters after they are all done. I started with a white base and added polka dots of red, yellow and purple. These dots were sponged on but I sometimes free hand them if a sponge is not handy. It is very easy to do. When I was happy with the dots I let the letter completely dry and then sprayed a clear enamel on them for a glossy finish and a layer of protection against the elements.
I used a floral wire that I wrapped with white floral tape to secure my letter on. You can use a chenille stem for this. If you are doing a colored letter, I suggest getting a chenille stem of the same color. It is camoflaged a little better that way.
Now for the bow...don't be intimidated because you can't tie an elaborate bow. This is just a basic bow that anyone can tie. I simply did two loops and made sure that my tails were hanging down. I secured it with a wrapped wire and tied natural colored raffia to the middle to hide the wire. Very easy :)
Secure the bow in place using the same wire that you tied the bow with.
Now it is time to add the main flower. This is also the time to decide what shape you want your flowers to be in. I prefer a cresent shape when I am adding accent pieces (the letter in this case). Feel free to add flowers all around.
Notice the placement of the blooms. I wanted the cresent longer on the bottom so I added three blooms. The top only has two. I used my greenery as wisely as I could to get as much coverage as possible.
Next I added the orchids and a touch of fern. The orchids were my second "choice" flower. I choose the green because it accents the red. I also had to take into consideration the size of the flower. It is important to choose something that would not overpower your main flower. The orchids are about the same size of the geraniums so they balance each other nicely.
I also added two fern leaves in this step. Notice the placement on the bottom to add to the heaviness of the lower section of the arrangement.
Here is another shot.
Next comes the filler flower. As previously stated I chose the small white daisies. I love the way the white pops out and it also ties in with the white of the letter. The main idea of filler is basic. Fill in the spots that need a little something else and add a little extra color to your arrangement. For this size wreath I put three sprigs on top and three sprigs on the bottom of the bow. If you need a little more that is perfectly fine. If you didn't add as much greenery as I have then it is very likely that you may need extra. It is also great if you want to add a second filler to get another color worked into the arrangement.
The last step is to add the remainder of your greenery. I used the lighter long stemmed greenery to extend my cresent shape. I put a piece on each end. I also put a piece coming out under the bow which helps with the heavier bottom look that I was going for. Finally I added the woodsy sprigs for some texture. Think of this one as the filler greenery. I put two on the top and three on the bottom. If you are unsure of placement it is safe to put them close to your filler flower.
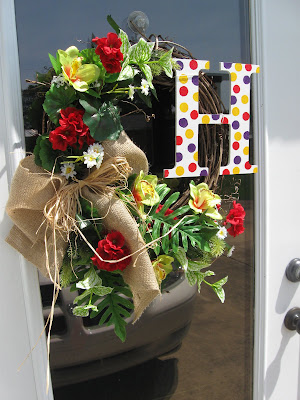
Here are a couple pictures of my finished wreath from both sides.


